Before Your Laminate Flooring Arrives


How to prepare for installation day.
Owning a home, it seems, is all about being prepared. The arrival of new laminate flooring is no exception, especially when one realizes that laminate, like any floor covering, impacts interior beauty, design, comfort, livability and upkeep
One thing is certain, being ready for the installation of your new laminate flooring will make the entire process go faster, more efficiently, and hopefully eliminate any “surprises.”
Knowing what to expect and being prepared will also be a lot less stressful on you, your family and your home.
Decision #1: install it yourself or allow us to.
While many people attempt to install laminate flooring on their own, this job is still difficult work, labor intensive and extremely exacting.
If you are not a seasoned DIYer, we strongly recommend you call upon our professionals to install your laminate floor.
That way you can be assured of a beautiful, efficient and correct installation.
Which is precisely what our goal is for you.
However, while installing laminate flooring is a skill that is developed through years of experience, your understanding of the basics of installation will increase your knowledge of the process and enhance your confidence in the professionals working in your home.
So please allow us to cover some of these basics with you.
Today there are many manufacturers producing laminate flooring products.
Most manufacturers have their own specific installation guidelines; however the overall process is the same. Understand this one and you’re done.
Laminate floors use what is known as a “floating floor” installation. This means, the planks or tiles simply lay on top of the floor without being adhered to the subfloor and are only adhered to each other on the edges.
Side seams are either glued together or joined using a “glueless” installation where the planks or tiles tightly interlock together. Both installations are considered floating floors.
Subfloor examination is step one.
The first step our installers take is to closely inspect your subfloor for any imperfections. Should your subfloor require additional labor to allow us to meet the manufacturers requirements for installation, we will discuss this with you prior to any additional work being done. Please note that most manufacturers require a level subfloor with a tolerance of 3/16” every 10 feet.
While no floor is perfectly level, the subfloor should be checked for any noticeable gaps or ridges that could cause problems.
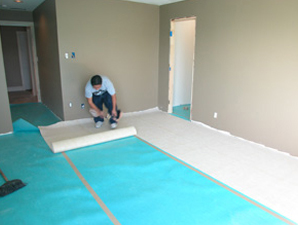
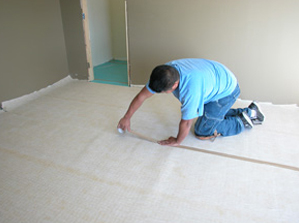
Next, we roll out the underlayment.
Our installers now put down an underlayment directly over your subfloor.
This underlayment allows the floor to expand and contract with changes in temperature and also acts as a sound and moisture barrier. Both good ideas.
In some installations, there are two underlayment layers.
The first layer is installed to specifically act as a moisture barrier while the second layer provides a sound barrier and enhances your flooring’s performance.
The underlayment is typically rolled out and taped together at the seams.
Our installers will cut the pieces of underlayment where needed with a precision utility knife to make a perfect fit.
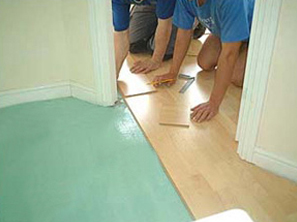
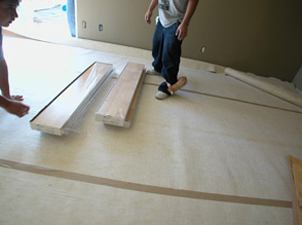
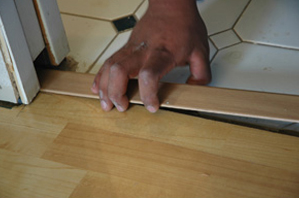
Now your laminate planks or tiles can be laid.
Our installers will typically begin in the left corner of the area and leave a minimum 1/4" space between the flooring and the perimeter walls.
This is done because the laminate requires space around the edges of the room to expand or contract.
Without that “breathing room” your floor will express its discontent. If the floor is touching or too close to a wall, it can buckle in the middle.
Along the wall, our installers use spacers as they work, to ensure the accuracy of this perimeter space.
They use one spacer for each square foot. Once your floor is fully installed they remove the spacers and cover the perimeter gap with quarter round trim or a wall base.
As our installers lay the planks or tiles in the desired pattern, they will carefully measure and precisely cut them to fit.
Clueless about glueless? Allow us to explain.
As mentioned earlier, many laminates today don’t require glue for the installation.
These glueless products have significantly impacted the laminate flooring industry and there are several reasons why the glueless laminates are so popular.
Most importantly, they are easier to install. Our installers put down an underlayment and the laminate planks or tiles interlock to each other one at a time.
If something goes wrong during installation, your floor can be dismantled plank-by-plank, or tile-by-tile, and re-built.
If one of the panels gets damaged after installation, your entire floor can be removed, the damaged panel replaced, and the floor can be put back together again.
Some installations need glue.
For floors that require glue on the sides of the planks or tiles, our installers begin by gluing the first two panels in the first row together.
Again, as per the manufacturer’s instructions, they start in the left-hand corner and glue the first row together at the ends.
As they glue each plank or tile they apply clamps or use straps to hold the pieces together.
Although planks or tiles usually fit together easily, installers will sometimes use a tapping block while fitting them together.
For installations that use glue, once the floor is completed and the glue is dry, installers then remove the spacers.
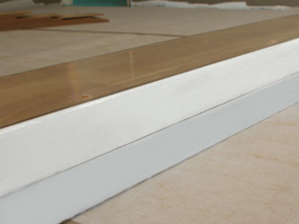
Then, your new floor gets the final touch.
To finish your floor, our installers add molding to cover the perimeter gap and install any additional transition trim pieces needed in doorways or where the laminate meets a different type of flooring.
Custom finished moldings and trim will give your laminate flooring a beautiful, finished look. They are all coordinated to match or accentuate the design of your floor. It’s all available as a part of our professional installation, all part of the art of installation.
For your information, here are some finishing terms and definitions.
Reducer Strip is used to create a smooth transition between two floors of different heights, as well as protect the plank or tile exposed edges from damage caused by foot traffic.
Overlapping Stair Nosing is similar to a flush stair nosing except the nosing overlaps the exposed edge of your floor.
The overlapping stair nosing is secured to the sub floor and not to the laminate floor so the floor is free to move. Recall the “floating floor” idea we mentioned earlier in this section.
T-Molding is used to bridge two areas of flooring that are the exact same height.
The T-Molding overlaps the exposed edges of the floor and is secured only to the sub floor, never to the flooring itself.
Generally this trim is used as the transition piece between rooms, or as the expansion piece for areas that exceed 30 feet in length.
Universal Edge is also called a Square Nosing and is used where the laminate flooring butts up to carpeting, or various vertical surfaces where the edge will be exposed, such as along a fireplace.
Quarter Round gives the floor a finished look and protects the edges of your laminate flooring.
The result is a beautifully installed laminate floor.
What to know and do before installation day
Relocate your furniture.
Remove all furniture and other objects and materials from the areas to be floored. Before moving, you’ll also need to empty the contents of china cabinets, closets and the like.
Be aware that the area of installation must be climate controlled (heated or air conditioned). Laminate flooring manufacturers require indoor humidity to be maintained between 45-65%.
What’s to be done with your present floor covering?
Please consider how your old floor covering will be taken up and disposed of. This can be a time consuming and messy task. We will be happy to discuss removal options with you.
If you prefer to remove your present floor covering yourself, do it at least one day prior to installation to allow for cleanup and floor preparation. If removing old carpet, please leave tack strips in place and pull the staples out of the floor from the original pad.
Now turn your attention to the trim.
You should know that, in many cases, moldings and baseboards need to be removed for laminate installation. Our installers will do this for an additional charge but will not be responsible for damage or breakage due to dry or brittle wood.
Painted baseboards, woodwork and paint may need retouching after the installation is complete. If necessary, this is your responsibility.
Get expert council on your sub flooring.
Your existing sub floor may need to be prepared to receive the laminate, or a new subfloor may be required. This is a job best left to the professionals and, again, we can help you with these decisions.
It is important that the subfloor be as clean and level. That helps insure your new laminate flooring will be as beautiful and well supported as possible and ultimately covered by the manufacturer’s warranty.
Include a door plan in your preparation.
When laminate flooring is installed, there’s always the possibility that the doors, especially closet doors, basement and bedroom doors, may not clear the new floor and swing free.
Our installers may remove doors in order to install the laminate and re-hang them at an additional cost. If there is a clearance issue you may want to arrange for a qualified carpenter to shave or cut down your door(s) after the installation of your new laminate floor.
Don’t let clean-up be a toss-up.
Installing new laminate flooring will produce waste. These materials will be collected and disposed of by our installers at an additional cost.
What to know and do during installation day
On installation day be home and handy.
Be prepared to be at home the day of installation and be available in case our installation crew has questions. Your presence will insure that the correct laminate is installed in the right areas. Because it is difficult to estimate the length and circumstances of each job, we may not be able to give you an exact time of arrival but we will provide a time frame.
Your family is our concern.
Our installers will use a variety of tools and techniques that can make the work area hazardous. Please make sure that your children and pets are kept out of the work area on installation day.
Follow through with a walk-thru.
We recommend that, prior to the completion of the installation; you walk thru the job with our installation team. This will give you the opportunity to ask questions and be clear on any final details.
What to know and do after installation day
Clear the air.
If you are sensitive to dust and odors, good ventilation should be established for 48 to 72 hours after installation.
Being prepared is the result of being informed.
We want you to be as well prepared as possible for the installation of your new laminate flooring. To that end we’ve assembled the most knowledgeable sales people and the most experienced installers to provide you with solid information, reliable resources and proven solutions.
We hope that the information we’ve featured here leads you to a better understanding of how to prepare for installation day.