Before Your Ceramic Tile Arrives

Home is where you welcome the world, including our installers.
Through your front entryway passes friends, neighbors, overnight guests and many of these visits require some form of readiness by you.
In fact, owning a home, it seems, is all about being prepared.
The arrival of new ceramic tile flooring is no exception, especially when one realizes that tile, like any floor covering, impacts interior beauty, design, décor, comfort, livability and upkeep.
It’s a truth of housing: floor coverings can make, or break, a home.
One thing is certain, being ready for the installation of your new ceramic tile will make the entire process go faster, more efficiently, and hopefully eliminate any “surprises.”
Knowing what to expect and being prepared will also be a lot less stressful on you, your family and your home.
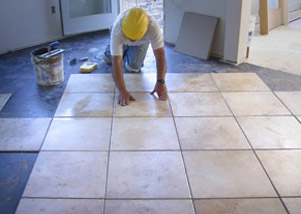
Get the best possible results: let us install your tile.
Installing this type of floor is difficult work, labor intensive and extremely exacting.
We strongly recommend you call upon our reliable, seasoned and dedicated professionals to install your ceramic tile floor.
That way you can be assured of a beautiful, efficient and correct installation.
Which is precisely what our goal is for you.
However, while installing ceramic tile flooring is a skill that is developed through years of experience, your understanding of the basics of installation will increase your knowledge of the process and enhance your confidence in the professionals working in your home.
So please allow us to cover some of the fundamentals with you.
Ceramic tile installers are craftsman with age-old skills. Expertise has been handed down from one generation to the next over dozens of centuries.
Through the years, new methods and materials have been introduced, but tile setting remains the same hand-operated, labor-intensive process that it has been since ancient times.
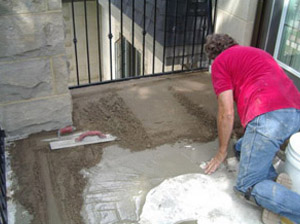
The process begins with the preparation of the ceramic tile foundation, or what’s called the substrate.
Common materials used as tile substrates in home installations include concrete, plywood, and drywall.
Our installers will prepare the substrate by different methods, depending on the substrate material, and where the installation occurs.
Each substrate has its own unique set of issues, yours included, and is prepared according to industry and manufacturer guidelines. So you can rest assured it’s done to recognized standards.
The first step in your ceramic tile installation involves the cleaning of the substrate. Dirt, moisture, and oil can interfere with the adhesion of the tile, so care is taken to remove all foreign debris prior to beginning.
Next our installers will level the surface of the substrate. Why is this step necessary? It’s to provide a strong support base for the tile, and to ensure that the individual tiles will appear flat when installed.
Flat, obviously, is the goal. If the substrate is not level or flat, the result could be tiles not being set correctly that can cause chipping or cracking when weight is applied.
Tile setting has progressed through thick and thin.
In the past, ceramic tile was installed using what is called the thickset or mud set method.
In this method, a thick layer of mortar was applied to a waterproofed and steel reinforced substrate. This provided a strong, flat base onto which the tile was installed.
The thickset method is the most effective installation method for 18” or larger tile. While it is an involved, labor-intensive and more costly process, it is the only proper way to install larger tile.
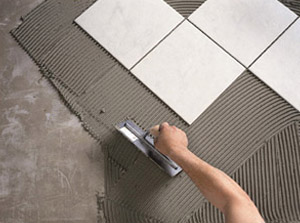
Today, many tile installers have opted for the industry accepted and more efficient thin set method, where the tile is adhered directly onto a backer board that is nailed to a plywood or concrete substrate using a much thinner layer of mortar.
This backer board is called a CBU, or cement backer unit, which provides a supportive and water resistant layer between the porous substrate and the mortar and tile applied on top of it.
And now, the planning stage.
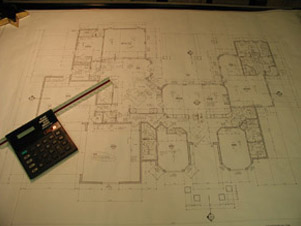
Once the substrate has been prepared, the next step is to create a layout plan.
This plan shows the dimensions of each room, and will help determine the amount of ceramic tile and other materials needed for the installation.
Our installers will use this plan to estimate the amount of product needed, and to anticipate any installation issues that may be caused by architectural features like stairs, transitions, and cabinets.
Our installers will also use the layout plan to determine the pattern and orientation of the installed tile.
When it comes to accuracy, we tow the line.
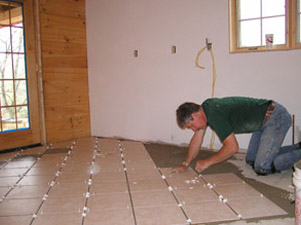
Now a chalk line is used to lay down a guide for our installers to work from.
This leaves a temporary line that can be used as a straight guide.
The installers may lay out some tile with spacers to give them a better sense of how the tile will fit into the room. Some installers will just use the chalk line as their guide and get right to the installation.
Once they have determined the correct layout, the next step is to apply the adhesive mortar to the substrate.
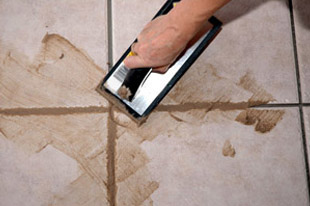
The last step is all about grout.
Once the tiled floor has been set into place and left to fully cure, usually 12 to 24 hours, the grout is applied. Quick set grout is also an option for smaller areas or where time does not permit. Please discuss this upgrade option with our sales associate.
Grout is available in a wide range of colors, and in sanded and unsanded forms.
Sanded grout is commonly used for grout joints that are wider than 1/8th of an inch.
This type of grout joint is typically used with floor tile because it helps strengthen tile joint and it will not sag after it is cured.
Unsanded grout is an option that may be used with narrow grout joints, wall tile and many natural stone installations.
So, you may be wondering, how long before I can walk on my new floor?
The mortar and grout need 24 hours to cure before walking on the tile.
This ensures that the tiles won’t shift or become loose before the adhesive thinset mortar and grout have a chance to set.
In some installations the tile may be light mopped daily for several days to prevent the grout from cracking, pulling moisture from the underlying mortar, or curing unevenly.
And that is how your new ceramic tile floor will be professionally installed.
What to know and do before installation day
Relocate your furniture.
Remove all furniture and other objects and materials from the areas to be floored. Before moving, you’ll also need to empty the contents of china cabinets, closets and the like.
Be aware that the area of installation must be climate controlled (heated or air conditioned). Ceramic tile flooring manufacturers require indoor humidity to be maintained between 45-65%.
What’s to be done with your present floor covering?
Please consider how your old floor covering will be taken up and disposed of. This can be a time consuming and messy task. We will be happy to discuss removal options with you.
If you prefer to remove your present floor covering yourself, do it at least one day prior to installation to allow for cleanup and floor preparation. If removing old carpet, please leave tack strips in place and pull the staples out of the floor from the original pad.
Now turn your attention to the trim.
You should know that, in many cases, moldings and baseboards need to be removed for ceramic tile installation. Our installers will do this for an additional charge but will not be responsible for damage or breakage due to dry or brittle wood.
Painted baseboards, woodwork and paint may need retouching after the installation is complete. If necessary, this is your responsibility.
Get expert council on your sub flooring.
Your existing sub floor may need to be prepared to receive the tile, or a new subfloor may be required. This is a job best left to the professionals and, again, we can help you with these decisions.
It is important that the subfloor be as clean and level. That helps insure your new tile flooring will be as beautiful and well supported as possible and ultimately covered by the manufacturer’s warranty.
Include a door plan in your preparation.
When ceramic tile flooring is installed, there’s always the possibility that the doors, especially closet doors, basement and bedroom doors, may not clear the new floor and swing free.
Our installers may remove doors in order to install the tile and re-hang them at an additional cost. If there is a clearance issue you may want to arrange for a qualified carpenter to shave or cut down your door(s) after the installation of your new tile floor.
Don’t let clean-up be a toss-up.
Installing new tile flooring will produce waste. These materials will be collected and disposed of by our installers at an additional cost.
What to know and do during installation day
On installation day be home and handy.
Be prepared to be at home the day of installation and be available in case our installation crew has questions. Your presence will insure that the correct ceramic tile is installed in the right areas. Because it is difficult to estimate the length and circumstances of each job, we may not be able to give you an exact time of arrival but we will provide a time frame.
Your family is our concern.
Our installers will use a variety of tools and techniques that can make the work area hazardous. Please make sure that your children and pets are kept out of the work area on installation day.
Follow through with a walk-thru.
We recommend that, prior to the completion of the installation; you walk thru the job with our installation team. This will give you the opportunity to ask questions and be clear on any final details.
What to know and do after installation day
Clear the air.
If you are sensitive to dust and odors, good ventilation should be established for 48 to 72 hours after installation.
Being prepared is the result of being informed.
We want you to be as well prepared as possible for the installation of your new ceramic tile flooring. To that end we’ve assembled the most knowledgeable sales people and the most experienced installers to provide you with solid information, reliable resources and proven solutions.
We hope that the information we’ve featured here leads you to a better understanding of how to prepare for installation day.